Sabtu, 25 Februari 2012
Selasa, 14 Februari 2012
Kaca Penipu

Kaca Penipu
Kaca PenipuDi dalam kaca..
sungguh cantik,
Di dalam kaca..
Sungguh molek..
Indah..
Senyum merekah..
Boleh kutahu..
Wanita secantik kamu..
Siapa namamu?
Cantika?
Jelita?
Atau Juwita?
Siapa namamu, cinta?
Tidak,..
Lihat Hatiku..
Itu hanya kaca.
Sekedar kaca ..
Namaku..
Dusta
Kamis, 09 Februari 2012
Materi TIK Kelas XII Semeste Ganjil
embagian Area Tool Box pada Adobe Photoshop CS3
Tahukah Anda bahwa Tool Box di dalam Adobe Photoshop dibagi-bagi areanya
berdasarkan fungsi dan kegunaannya? Hal ini untuk memudahkan kita
sebagai pengguna. Kali ini kami akan membahasnya untuk Anda khususnya
Adobe Photoshop CS3.
A. Selection Tool
1. Marquee Tool
2. Move Tool
3. Lasso Tool
4. Magic Wand Tool
B. Crop & Slice Tool
1. Crop Tool
2. Slice Tool
C. Retouching Tool
1. Patch/Healing Brush Tool
2. Stamp Tool
3. Eraser Tool
4. Sharpen, Blur and Smudge Tool
5. Dodge, Burn and Sponge Tool

D. Painting Tool
1. Brush Tool
2. History Brush Tool
3. Gradient and Paint Bucket Tool
E. Drawing & Type Tool
1. Selection Tool
2. Type Tool
3. Pen Tool
4. Convert Point Tool: Rectangle, Rounded, Ellipse, Line & Custom Shape Tool
F. Annotation, Measuring & Navigation Tool
1. Notes Tool
2. Eyedropper & Measure Tool
3. Hand Tool
4. Zoom Tool
5. Foreground & Background Color
6. Normal & Quick Mask Mode
7. Screen Mode
A. Selection Tool
1. Marquee Tool
2. Move Tool
3. Lasso Tool
4. Magic Wand Tool
B. Crop & Slice Tool
1. Crop Tool
2. Slice Tool
C. Retouching Tool
1. Patch/Healing Brush Tool
2. Stamp Tool
3. Eraser Tool
4. Sharpen, Blur and Smudge Tool
5. Dodge, Burn and Sponge Tool
D. Painting Tool
1. Brush Tool
2. History Brush Tool
3. Gradient and Paint Bucket Tool
E. Drawing & Type Tool
1. Selection Tool
2. Type Tool
3. Pen Tool
4. Convert Point Tool: Rectangle, Rounded, Ellipse, Line & Custom Shape Tool
F. Annotation, Measuring & Navigation Tool
1. Notes Tool
2. Eyedropper & Measure Tool
3. Hand Tool
4. Zoom Tool
5. Foreground & Background Color
6. Normal & Quick Mask Mode
7. Screen Mode
Pengenalan Tool Box Adobe Photoshop CS3 dan Cara Kerjanya
Di dalam Photoshop CS3 terdapat Tool Box yang terletak di sebelah
kiri canvas yang biasanya digunakan untuk membantu dalam mengedit atau
membuat objek gambar yang di inginkan.
Disini kami akan membahas fungsi dan kegunaan dari masing-masing tool tersebut. Adapun tanda segitiga kecil hitam yang terletak di sebelah kanan tool memberi arti masih ada lagi tool yang lain di dalamnya. Untuk melihatnya klik dan tahan tool tersebut ( Alt + klik tool tsb ). Tapi tidak semua tool memiliki tanda ini.
1. Move Tool (V), Untuk memindahkan objek gambar
Prakteknya : Aktifkan tombol ini dengan cara menekan tombol V pada keyboard.
Saat di canvas, move tool digunakan untuk memindahkan objek, dan menyeleksi layer-layer (klik kanan pada objek) juga meng-copy dan memindahkan objek secara bersamaan (alt+layer yang bersangkutan).
Kombinasi lain, move tool dipakai saat melakukan perputaran objek, klik dan tekan tombol ctrl untuk mendapatkan putaran per 45 derajat.
Saat di window layers, move tool digunakan untuk menyeleksi objek (ctrl+klik layer).

2. Rectangular Marquee Tool (M), Untuk membuat seleksi berbentuk kotak persegi empat
Prakteknya : Pilih menu Select -> Transform Selection untuk mengubah seleksi dan menu Select -> Feather untuk mengatur ketajaman pinggiran potongan.
3. Polygonal Lasso Tool (L), Untuk membuat seleksi lurus
Prakteknya : Digunakan untuk menyeleksi bagian dari suatu objek. Jika tombol Alt ditekan maka Polygonal Lasso Tool akan berfungsi seperti Lasso Tool biasa.
4. Crop Tool (C), Untuk memotong gambar
Prakteknya : Crop tool juga bisa digunakan untuk menghilangkan bagian yang tidak diseleksi. Contoh yang sering dilakukan adalah untuk memperbaiki hasil scan yang miring.
5. Slice Tool (K), Untuk membuat pembagian gambar
6. Brush Tool (B), Untuk menggambar atau mewarnai dengan bentuk kuas
Prakteknya : Brush Tool digunakan sebagai kuas dalam mengambar dengan mouse. Atur besar kecilnya brush, hardness, opacity, dan flow dalam Option.
7. Spot Healing Brush Tool (J), Untuk memperbaiki kerusakan gambar.
Prakteknya : Di sini Anda tidak perlu menentukan area yang akan digunakan sebagai patokan, karena akan secara otomatis terpilih dari area di sekitarnya.
8. Clone Stamp Tool (S), Untuk melakukan duplikasi/copy area tertentu pada sebuah gambar atau biasa disebut cloning.
Prakteknya : Tekan ALT pada objek yang akan dikloning, kemudian gerakkan mouse pada area tempat objek baru mau diletakkan.
9. Magic Wand Tool (W), Untuk menyeleksi gambar yang memiliki warna sama.
10. Gradient Tool (G), Untuk menghasilkan warna gradasi.
Prakteknya : Saat ingin memberikan warna gradasi sebaiknya lakukan seleksi terlebih dahulu bagian mana yang akan diisi warna gradasi. Jika tidak, maka seluruh kanvas terisi dengan gradasi.
11. Eraser Tool (E), Untuk menghapus gambar yang tidak kita inginkan.
12. Blur Tool (R), Untuk mengaburkan area atau memburamkan gambar.
Prakteknya : Klik atau klik + drag untuk mendapatkan hasil blur yang di inginkan. Contoh :dapat di gunakan untuk menghilangkan bintik-bintik pada wajah.
13. Dodge tool (O), Untuk membuat area menjadi lebih terang.
14. Horizontal Type Tool (T), untuk membuat teks secar horisontal.
Prakteknya :Buat area (klik + drag) agar tulisan tidak terus memanjang ke kanan. Hasil teks dapat diatur alignment-nya juga dapat dipindahkan dengan Move Tool.
15. Pen Tool (P), Untuk membuat gambar (garis lurus dan lengkung) dalam bentuk path/vektor.
Prakteknya : Klik sekali untuk membuat anchor point, kemudian jika kurva telah terbentuk, drag anchor point untuk membuat direction point. Path yang dibuat oleh Pen Tool dapat diubah menjadi selection.
16. Custom Shape Tool (U), Untuk membentuk bebas
Prakteknya : Pilih di bagian Option bentuk-bentuk shape yang di inginkan. Untuk menambah bentuk lain, klik segitiga kecil hitam di sebelah kanan.
17. Direct Selection Tool (A), Untuk merapikan alur path
18. Eyedropper Tool (I), Untuk memilih warna dari sebuah objek.
19. Notes Tool (N), Untuk membuat catatan pada image seperti copyright.
Prakteknya : Klik sekali saja untuk membuat notes. Notes tidak akan terlihat di layer. Jadi untuk menggagalkannya lakukan undo (ctrl + alt + Z)
20. Hand Tool (PH), Untuk menggeser tampilan (canvas) pada layar
Prakteknya : Ada shortcut lain yang bisa digunakan selain PH yaitu tombol spasi pada keyboard. Tekan spasi lalu gerak-gerakkan dengan mouse untuk menggeser tampilan canvas.
21. Zoom Tool (Z), Untuk memperbesar tampilan gambarPrakteknya : Klik objek yang akan diperbesar. Zoom juga bisa di gunakan untuk memperkecil gambar. Gambar yang akan di perbesar secara terus-menerus dapat di lakukan sambil meng-klik shift sebaliknya jika ingin memperkecil gambar lakukan klik + alt
22.Set Background Color, Untuk merubah warna baik depan maupun belakang
Prakteknya : Isi warna pada area yang tersedia dengan cara, pilih Edit > Fill > Use pilih Background Color atau shift + F5 > Use pilih Background Color atau aktifkan tool ini dengan memilih tool Move Tool terlebih dahulu lalu klik ctrl + del. Jika anda ingin mengisi warna pada suatu area itu saja tanpa mempengaruhi area lain lakukan dengan cara menekan tombol shift + ctrl + del bersamaan.
23. Set Forefround Color, Untuk merubah warna baik depan maupun belakang
Prakteknya : Isi warna pada area yang tersedia dengan cara, pilih Edit > Fill > Use pilih Foreground Color atau shift + F5 > Use pilih Foreground Color atau aktifkan tool ini dengan memilih tool Move Tool terlebih dahulu lalu klik alt + del. Jika anda ingin mengisi warna pada suatu area itu saja tanpa mempengaruhi area lain lakukan dengan cara menekan tombol shift + alt + del bersamaan.
Supaya default tekan tombol D maka warna foreground dan background menjadi putih dan hitam. Untuk menukar warna background dan foreground tekan tombol X.
24. Edit in Quick Mask Mode (Q), Untuk pengeditan menggunakan efek maskPrakteknya : Digunakan untuk menyeleksi dengan menggunakan Brush Tool. Aktifkan tool ini dengan menekan tombol Q pada keyboard.
25. Change Screen Mode (F), Untuk merubah tampilan lay
Now we have a general idea of how to make selections of various shapes in Photoshop. There is also a way to select objects and areas based on color.
Take the diagram below for example. Using the Magic Wand Tool, it simply takes one click in the white area to make a selection of that space.

Working from an existing selection, simply hold shift and create a new selection. This will add your new selection to the existing selection.

To move a selected part of an image, simply select the move tool, and then click and drag your selection as you please. This will Cut the selection out from it’s current location, and reposition it to wherever you release the mouse button.

Microsoft PowerPoint merupakan software produk Microsoft® yang dikhususkan untuk pembangunan atau pembuatan slide untuk presentasi. Microsoft PowerPoint memiliki beberapa alat bantu (tools) yang membantu perancang slide untuk mendesain slide sehingga tampil lebih menarik dan mudah dikendalikan saat melakukan presentasi.
Sebelum kita mengenal PowerPoint, kita buka dulu software Microsoft PowerPoint. Untuk membukanya, klik tombol Start - All Program - Microsoft Office - Microsoft PowerPoint
Disini kami akan membahas fungsi dan kegunaan dari masing-masing tool tersebut. Adapun tanda segitiga kecil hitam yang terletak di sebelah kanan tool memberi arti masih ada lagi tool yang lain di dalamnya. Untuk melihatnya klik dan tahan tool tersebut ( Alt + klik tool tsb ). Tapi tidak semua tool memiliki tanda ini.
1. Move Tool (V), Untuk memindahkan objek gambar
Prakteknya : Aktifkan tombol ini dengan cara menekan tombol V pada keyboard.
Saat di canvas, move tool digunakan untuk memindahkan objek, dan menyeleksi layer-layer (klik kanan pada objek) juga meng-copy dan memindahkan objek secara bersamaan (alt+layer yang bersangkutan).
Kombinasi lain, move tool dipakai saat melakukan perputaran objek, klik dan tekan tombol ctrl untuk mendapatkan putaran per 45 derajat.
Saat di window layers, move tool digunakan untuk menyeleksi objek (ctrl+klik layer).
2. Rectangular Marquee Tool (M), Untuk membuat seleksi berbentuk kotak persegi empat
Prakteknya : Pilih menu Select -> Transform Selection untuk mengubah seleksi dan menu Select -> Feather untuk mengatur ketajaman pinggiran potongan.
3. Polygonal Lasso Tool (L), Untuk membuat seleksi lurus
Prakteknya : Digunakan untuk menyeleksi bagian dari suatu objek. Jika tombol Alt ditekan maka Polygonal Lasso Tool akan berfungsi seperti Lasso Tool biasa.
4. Crop Tool (C), Untuk memotong gambar
Prakteknya : Crop tool juga bisa digunakan untuk menghilangkan bagian yang tidak diseleksi. Contoh yang sering dilakukan adalah untuk memperbaiki hasil scan yang miring.
5. Slice Tool (K), Untuk membuat pembagian gambar
6. Brush Tool (B), Untuk menggambar atau mewarnai dengan bentuk kuas
Prakteknya : Brush Tool digunakan sebagai kuas dalam mengambar dengan mouse. Atur besar kecilnya brush, hardness, opacity, dan flow dalam Option.
7. Spot Healing Brush Tool (J), Untuk memperbaiki kerusakan gambar.
Prakteknya : Di sini Anda tidak perlu menentukan area yang akan digunakan sebagai patokan, karena akan secara otomatis terpilih dari area di sekitarnya.
8. Clone Stamp Tool (S), Untuk melakukan duplikasi/copy area tertentu pada sebuah gambar atau biasa disebut cloning.
Prakteknya : Tekan ALT pada objek yang akan dikloning, kemudian gerakkan mouse pada area tempat objek baru mau diletakkan.
9. Magic Wand Tool (W), Untuk menyeleksi gambar yang memiliki warna sama.
10. Gradient Tool (G), Untuk menghasilkan warna gradasi.
Prakteknya : Saat ingin memberikan warna gradasi sebaiknya lakukan seleksi terlebih dahulu bagian mana yang akan diisi warna gradasi. Jika tidak, maka seluruh kanvas terisi dengan gradasi.
11. Eraser Tool (E), Untuk menghapus gambar yang tidak kita inginkan.
12. Blur Tool (R), Untuk mengaburkan area atau memburamkan gambar.
Prakteknya : Klik atau klik + drag untuk mendapatkan hasil blur yang di inginkan. Contoh :dapat di gunakan untuk menghilangkan bintik-bintik pada wajah.
13. Dodge tool (O), Untuk membuat area menjadi lebih terang.
14. Horizontal Type Tool (T), untuk membuat teks secar horisontal.
Prakteknya :Buat area (klik + drag) agar tulisan tidak terus memanjang ke kanan. Hasil teks dapat diatur alignment-nya juga dapat dipindahkan dengan Move Tool.
15. Pen Tool (P), Untuk membuat gambar (garis lurus dan lengkung) dalam bentuk path/vektor.
Prakteknya : Klik sekali untuk membuat anchor point, kemudian jika kurva telah terbentuk, drag anchor point untuk membuat direction point. Path yang dibuat oleh Pen Tool dapat diubah menjadi selection.
16. Custom Shape Tool (U), Untuk membentuk bebas
Prakteknya : Pilih di bagian Option bentuk-bentuk shape yang di inginkan. Untuk menambah bentuk lain, klik segitiga kecil hitam di sebelah kanan.
17. Direct Selection Tool (A), Untuk merapikan alur path
18. Eyedropper Tool (I), Untuk memilih warna dari sebuah objek.
19. Notes Tool (N), Untuk membuat catatan pada image seperti copyright.
Prakteknya : Klik sekali saja untuk membuat notes. Notes tidak akan terlihat di layer. Jadi untuk menggagalkannya lakukan undo (ctrl + alt + Z)
20. Hand Tool (PH), Untuk menggeser tampilan (canvas) pada layar
Prakteknya : Ada shortcut lain yang bisa digunakan selain PH yaitu tombol spasi pada keyboard. Tekan spasi lalu gerak-gerakkan dengan mouse untuk menggeser tampilan canvas.
21. Zoom Tool (Z), Untuk memperbesar tampilan gambarPrakteknya : Klik objek yang akan diperbesar. Zoom juga bisa di gunakan untuk memperkecil gambar. Gambar yang akan di perbesar secara terus-menerus dapat di lakukan sambil meng-klik shift sebaliknya jika ingin memperkecil gambar lakukan klik + alt
22.Set Background Color, Untuk merubah warna baik depan maupun belakang
Prakteknya : Isi warna pada area yang tersedia dengan cara, pilih Edit > Fill > Use pilih Background Color atau shift + F5 > Use pilih Background Color atau aktifkan tool ini dengan memilih tool Move Tool terlebih dahulu lalu klik ctrl + del. Jika anda ingin mengisi warna pada suatu area itu saja tanpa mempengaruhi area lain lakukan dengan cara menekan tombol shift + ctrl + del bersamaan.
23. Set Forefround Color, Untuk merubah warna baik depan maupun belakang
Prakteknya : Isi warna pada area yang tersedia dengan cara, pilih Edit > Fill > Use pilih Foreground Color atau shift + F5 > Use pilih Foreground Color atau aktifkan tool ini dengan memilih tool Move Tool terlebih dahulu lalu klik alt + del. Jika anda ingin mengisi warna pada suatu area itu saja tanpa mempengaruhi area lain lakukan dengan cara menekan tombol shift + alt + del bersamaan.
Supaya default tekan tombol D maka warna foreground dan background menjadi putih dan hitam. Untuk menukar warna background dan foreground tekan tombol X.
24. Edit in Quick Mask Mode (Q), Untuk pengeditan menggunakan efek maskPrakteknya : Digunakan untuk menyeleksi dengan menggunakan Brush Tool. Aktifkan tool ini dengan menekan tombol Q pada keyboard.
25. Change Screen Mode (F), Untuk merubah tampilan lay
Bermain dengan layer photoshop
In Photoshop, layers are used to work on individual parts of an image
while not affecting other parts. You might say that layers are like
transparency papers stacked on top of one another which can be
repositioned and separately drawn on without disturbing each other.

To the viewer, this is simply one flat graphic. However, in Photoshop, it is actually 4 separate layers (graphics if you will) stacked on top of one another. There is a Blue Background layer, two separate layers with a T9 Cloud, and a top layer with the “Tutorial9″ text.

As you can see, layers are more like transparencies stacked on top of one another, each with something different sketched onto them.
Let’s put this knowledge to use now!
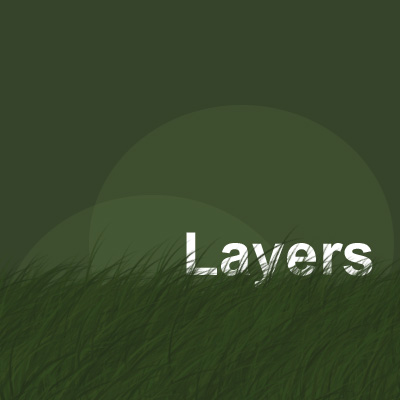
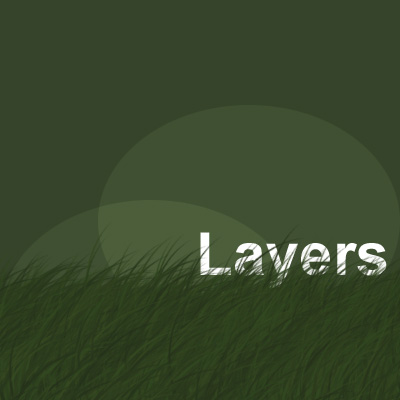
We’re going to create the following graphic using layers:
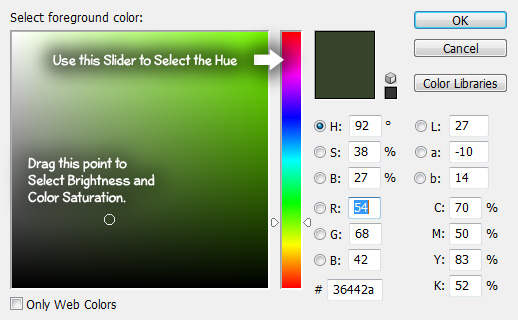
Select a Dull Green Foreground Color. To do this, click your foreground color, and use the color sliders to find a suitable color. Alternatively, you can enter the HEX value 36442a next to the “#” symbol on the lower right side.

Click OK to confirm the color value you’ve picked. Now grab the Fill Tool from the Toolbox, and click anywhere in your working image area. Upon clicking the mouse button, your entire background layer should be filled with the foreground color.

To create a new layer, Click the “New Layer” icon shown above.
As you can see, a new layer “Layer 1” has been created. You can rename this layer by clicking the name of it twice, and entering whatever name you desire. While this layer is selected (highlighted) you will be working on this layer alone in the photoshop document!
In the brush tool’s Option Bar, open the Brush Preset Picker (Small down arrow to the right of the currently selected “Brush”). Scroll a ways down the list, and select the Dune Grass Brush.
We’re not going to go over brushes in great detail in the tutorial, but you do need to know that this brush is setup to alternate between foreground and background colors. Because of this, we need to select a background color with a similar green value (Such as #19250f).
Once you have a good foreground and background color selected, start painting with your brush in the working image area on your new layer. Hold down the Mouse Button to use the brush tool.
Let’s add some text now!
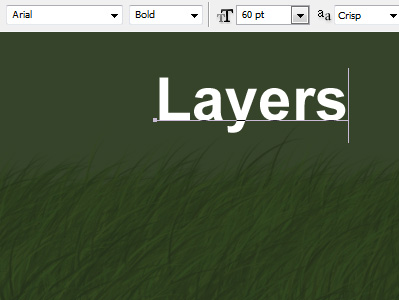
Once you’ve typed something, select all of the text with your cursor (hold down the mouse button, and drag over the text to select). We’re going to adjust some of the type attributes in the Type Options Bar.
Set the Font to Arial, the font weight to Bold, the text size to 60 pt, and the anti-aliasing to Crisp.
As you can see, the Type Tool has created a new Type Layer in your layers palette for the text. To apply the text, click this new layer (Or click Ctrl + Enter).
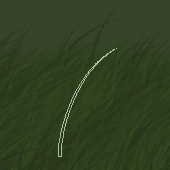
Great! Now let’s position our new type tool so that it appears to be emerging from the grass.
Now we can use the Move Tool to reposition our layer in the working image area. While the Type Layer is selected,get the Move Tool from the toolbox, and drag the text in the working image area to where the grass starts to end.
Pretty Simple, eh? Now that you have the general idea of layers down, let’s create a few more and play with some of their options.
Using the Fill Tool, fill this selection (on your new layer) with White. Once filled, Deselect everything (Select > Deselect, or Ctrl + D).
You should have a large, white circle in your document now. Set this layers Blending Mode to Overlay in the layers palette:
Setting the blending mode is that easy! I won’t go into details about blending modes in this tutorial, but please experiment with them to get an idea of what they do.
Now set the Opacity to something like 15-20%.
Simple! Now right click this new layer, and select Duplicate Layer. This will create an exact copy of this layer (retaining layer opacity and blending mode). Using the Move Tool reposition this layer so that you can clearly see the two different circle edges.
See how you can see through the top circle to see the circle behind it? This is because our circle layers are somewhat transparent, otherwise known as less opaque. By setting the opacity to something below 100%, we are able to see through objects.

Finally, let’s take a look at one more useful feature in the layers palette. Click the New Group icon at the bottom of the layers palette (the one shaped like a folder).
Groups function in a similar manner to a folder. You can put multiple layers inside of a group, and then when you select the group (versus an individual layer), you’re able to adjust the opacity, blending mode, and position of all those layers at the same time (as well as several other things).
Let’s give it a try! Drag your two circle layers inside of the group.
Once both layers have been placed in the group (they should appear indented from the other layers), Select the Group in the layers palette. Using the Move Tool, drag inside of your working image area. Both your circle layers should move at the exact same time, yet they still retain their individual layer attributes!
Now that you have a better understanding of layers, learning some of Photoshop’s more interesting features should be a breeze!
Explaining Layers
Consider the following Graphic created in Adobe Photoshop:To the viewer, this is simply one flat graphic. However, in Photoshop, it is actually 4 separate layers (graphics if you will) stacked on top of one another. There is a Blue Background layer, two separate layers with a T9 Cloud, and a top layer with the “Tutorial9″ text.
As you can see, layers are more like transparencies stacked on top of one another, each with something different sketched onto them.
Let’s put this knowledge to use now!
How to use Layers in Photoshop
You may have an easier time understanding how to use layers if we take on a simple task in Photoshop that allows you to play with them yourself. Go ahead and Create a New Document (File > New). Set it up to be 400 x 400px, with a resolution of 72px/inch.We’re going to create the following graphic using layers:
Filling the Background
Typically, when I’m working in Photoshop, I like to work from the background to the top (probably because that’s how the graphic is seen by viewers), so to start things off we are going to fill our background layer with a nice dull green.Select a Dull Green Foreground Color. To do this, click your foreground color, and use the color sliders to find a suitable color. Alternatively, you can enter the HEX value 36442a next to the “#” symbol on the lower right side.
Click OK to confirm the color value you’ve picked. Now grab the Fill Tool from the Toolbox, and click anywhere in your working image area. Upon clicking the mouse button, your entire background layer should be filled with the foreground color.
Create a New Layer
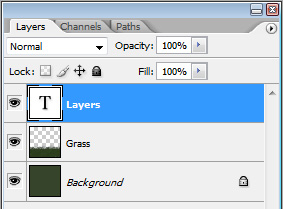
Let’s take a quick peek at the Layers Palette, and examine some of it’s more basic functions:To create a new layer, Click the “New Layer” icon shown above.
As you can see, a new layer “Layer 1” has been created. You can rename this layer by clicking the name of it twice, and entering whatever name you desire. While this layer is selected (highlighted) you will be working on this layer alone in the photoshop document!
Drawing the Grass
Select the Brush Tool from the toolbox. Adobe Photoshop already has a preset brush called “Dune Grass” which we are going to use to create the grass in our graphic.In the brush tool’s Option Bar, open the Brush Preset Picker (Small down arrow to the right of the currently selected “Brush”). Scroll a ways down the list, and select the Dune Grass Brush.
We’re not going to go over brushes in great detail in the tutorial, but you do need to know that this brush is setup to alternate between foreground and background colors. Because of this, we need to select a background color with a similar green value (Such as #19250f).
Once you have a good foreground and background color selected, start painting with your brush in the working image area on your new layer. Hold down the Mouse Button to use the brush tool.
Let’s add some text now!
The Type Tool
Select the Horizontal Type Tool from the toolbox. Set your Foreground Color to White. Click anywhere in your working image area to begin typing.Once you’ve typed something, select all of the text with your cursor (hold down the mouse button, and drag over the text to select). We’re going to adjust some of the type attributes in the Type Options Bar.
Set the Font to Arial, the font weight to Bold, the text size to 60 pt, and the anti-aliasing to Crisp.
As you can see, the Type Tool has created a new Type Layer in your layers palette for the text. To apply the text, click this new layer (Or click Ctrl + Enter).
Great! Now let’s position our new type tool so that it appears to be emerging from the grass.
Moving Layers
The first thing we need to do is position our Type Layer below the Grass Layer so that the Grass will appear in front of it. In your layers palette, click and drag your Type Layer below the Grass layer.Now we can use the Move Tool to reposition our layer in the working image area. While the Type Layer is selected,get the Move Tool from the toolbox, and drag the text in the working image area to where the grass starts to end.
Pretty Simple, eh? Now that you have the general idea of layers down, let’s create a few more and play with some of their options.
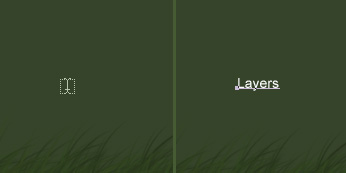
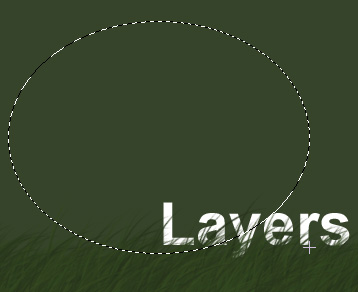
Opacity, Blending Modes & Filling Selections
Create a New Layer just above the background (below the type and grass layers), and drag out an elliptical selection using the Elliptical Marquee Tool (this tool may be hidden behind another marquee selection tool).Using the Fill Tool, fill this selection (on your new layer) with White. Once filled, Deselect everything (Select > Deselect, or Ctrl + D).
You should have a large, white circle in your document now. Set this layers Blending Mode to Overlay in the layers palette:
Setting the blending mode is that easy! I won’t go into details about blending modes in this tutorial, but please experiment with them to get an idea of what they do.
Now set the Opacity to something like 15-20%.
Simple! Now right click this new layer, and select Duplicate Layer. This will create an exact copy of this layer (retaining layer opacity and blending mode). Using the Move Tool reposition this layer so that you can clearly see the two different circle edges.
See how you can see through the top circle to see the circle behind it? This is because our circle layers are somewhat transparent, otherwise known as less opaque. By setting the opacity to something below 100%, we are able to see through objects.
Finally, let’s take a look at one more useful feature in the layers palette. Click the New Group icon at the bottom of the layers palette (the one shaped like a folder).
Groups function in a similar manner to a folder. You can put multiple layers inside of a group, and then when you select the group (versus an individual layer), you’re able to adjust the opacity, blending mode, and position of all those layers at the same time (as well as several other things).
Let’s give it a try! Drag your two circle layers inside of the group.
Once both layers have been placed in the group (they should appear indented from the other layers), Select the Group in the layers palette. Using the Move Tool, drag inside of your working image area. Both your circle layers should move at the exact same time, yet they still retain their individual layer attributes!
Now that you have a better understanding of layers, learning some of Photoshop’s more interesting features should be a breeze!
Bermain dengan Tool Seleksi
The selection tools are used to facilitate the process of making
selections of shapes, colors, and objects inside of Photoshop, and
positioning them in the working image area. With tools like the magnetic
lasso and magic wand, Photoshop packs a powerful array of selection
gadgets!
In Photoshop, selections are used to work in a specified area, while not altering any of the area around it. In many regards, a selection is a lot like a stencil. You basically are enabling yourself to only paint in one area while the rest of your canvas is left unaffected.
There are a variety of tools to help you draw out specific sizes and shapes of selections in Photoshop.

Piece of cake!
The Magnetic Lasso Tool sort of combines the first two tools mentioned here. You click once, and begin to drag a freehand selection around the object you wish to select. The magnetic lasso tool tries to automatically create points itself while you follow the edge of your object (you can define points by clicking if needed). The end result is a much smoother selection than the polygonal lasso tool will make.
In Photoshop, selections are used to work in a specified area, while not altering any of the area around it. In many regards, a selection is a lot like a stencil. You basically are enabling yourself to only paint in one area while the rest of your canvas is left unaffected.
There are a variety of tools to help you draw out specific sizes and shapes of selections in Photoshop.
Marquee Tools
The marquee tools are used to make rectangular, elliptical, horizontal and vertical line selections. To create a selection with a marquee tool, simple hold down your mouse button over the active image area, and drag out your shape.Piece of cake!
Perfect Circle and Square Selections
When making selections with the Rectangular Marquee Tool or Elliptical Marquee Tool, it’s possible to make perfect square and circular selections by holding shift when drawing our your selection.Lasso Tools
The Lasso Selection Tools allow you to make selections of irregular shapes. Using the ordinary lasso tool, simply click and drag a freehand selection with your mouse. With the Polygonal Lasso Tool, click to make various points which will define a selection, and finish your selection by clicking the starting point.The Magnetic Lasso Tool sort of combines the first two tools mentioned here. You click once, and begin to drag a freehand selection around the object you wish to select. The magnetic lasso tool tries to automatically create points itself while you follow the edge of your object (you can define points by clicking if needed). The end result is a much smoother selection than the polygonal lasso tool will make.
Now we have a general idea of how to make selections of various shapes in Photoshop. There is also a way to select objects and areas based on color.
Magic Wand Tool
The Magic Wand Tool is unlike the rest of the selection tools, in that is selects areas based on color. To use the Magic Wand Tool, you simply point and click the color you want to select in the active image area.Take the diagram below for example. Using the Magic Wand Tool, it simply takes one click in the white area to make a selection of that space.
Here’s a tip that ought to come in handy!
While using the Magic Wand Tool, it’s possible to select a wider (or
more narrow) range of colors when making your selection by adjusting the
Tolerance value in the options bar. The higher the value, the more similar colors will be selected!
Combining Selections
Sometimes, it’s necessary to combine multiple selections in order to select the ENTIRE area you want to work with. In times like these, it’s possible to combine multiple selections using an easy keyboard shortcut.Working from an existing selection, simply hold shift and create a new selection. This will add your new selection to the existing selection.
Subtracting and Intersecting Selections
Just like it is possible to add to an existing selection, you can also subtract from a selection (Hold Alt when drawing a new selection) and intersect selections (Hold Shift and Alt while drawing a new selection).Move Tool
The Move Tool is used for moving selected areas of an image, layers, shapes, and other objects.To move a selected part of an image, simply select the move tool, and then click and drag your selection as you please. This will Cut the selection out from it’s current location, and reposition it to wherever you release the mouse button.
Essentially, moving a selected object is like
cutting out a part of a painting, and then putting it somewhere else.
Just like cutting something out from a painting, the area which was
cutout will now show whatever is behind the canvas (in this case, the background color, or layer behind that area).
Crop Tool
The Crop Tool is used to resize the canvas and active image area. To use the crop tool, simply drag out a square that encompasses the area which you want to become the new canvas size.
Note that cropping an image will not delete layer
data. All layer data is preserved when an image is cropped to be smaller
in size. Some layer data may just not be visible since it might become
outside of the active image area.
Kelebihan Adobe Photoshop
Adobe Photoshop mempunyai banyak fasilitas yang memungkinkan seorang Desainer menciptakan efek-efek tertentu dan bisa menggunakan banyak variasi dari fasilitas yang disediakan oleh Adobe Photoshop, beberapa diantaranya yaitu:
Adobe Photoshop mempunyai banyak fasilitas yang memungkinkan seorang Desainer menciptakan efek-efek tertentu dan bisa menggunakan banyak variasi dari fasilitas yang disediakan oleh Adobe Photoshop, beberapa diantaranya yaitu:
- Membuat tulisan dengan effect tertentu.
Photoshop dapat mengubah bentuk tulisan menjadi lebih kreatif dan inovatif dengan tool effect yang ada didalamnya - Membuat tekstur dan material yang beragam.
Dengan langkah-langkah tertentu, seorang Desainer dapat membuat gambar misalnya daun, logam, air, dan bermacam gambar lainnya - Mengedit foto dan gambar yang sudah ada.
Dengan Photoshop kita dapat merubah gambar kita jelek menjadi bagus ataupun sebaliknya. Selain itu juga Photoshop dapat merubah foto seseorang menjadi sebuah gambar kartun. Atau dalam Design Grafis disebut vector and vexel. - Memproses materi Web.
Photoshop juga digunakan untuk keperluan web, misalnya: kompresi file gambar agar ukurannya lebih kecil, memotong gambar kecil-kecil (slice), dan membuat web photo gallery. Dengan Adobe Image Ready, gambar yang sudah ada bisa dibuat untuk keperluan web, misalnya menjadi rollover dan animasi GIF.
Kelemahan Adobe Photoshop
Dengan berkembangnya versi Photoshop sekarang ini spesifikasi Komputer untuk menjalankan program Adobe Photoshop juga harus sudah tinggi dan yang pasti akan diimbangi oleh harga yang tinggi pula.
Dengan berkembangnya versi Photoshop sekarang ini spesifikasi Komputer untuk menjalankan program Adobe Photoshop juga harus sudah tinggi dan yang pasti akan diimbangi oleh harga yang tinggi pula.
CorelDraw
CorelDraw adalah software yang dibuat oleh perusahaan Corel Corp yang digunakan untuk membuat, mengolah dan mencetak objek grafis berformat vektor. Meskipun demikian CorelDraw juga seringkali digunakan untuk mengolah objek bitmap yang bersifat simple task atau pekerjaan yang bersifat umum.
Kelebihan CorelDraw
- Interface dan penggunaan tool sangat mudah
Sangat terasa ketika kita menggunakan bezier tool, dibandingkan dengan menggunakan pen tool pada photoshop atau adobe illustrator. Ketika hasil objek diolah menggunakan shape tool maka tanpa harus ada tool satu persatu untuk pengubahan mode garis smooth, simetris dan cusp. - Proses pembuatan dan pengeditan objek cepat
Tidak ada layer visible atau tanpa dipengaruhi layer. Karena layer pada CorelDraw dibuat tak terlihat atau bersifat idle. Dengan adanya hal ini maka proses pemilihan objek juga cepat. Dan juga dengan satu atau dua tool saja, kita bisa membuat dan mengedit objek. - Ada blending color atau pencampuran warna secara live
Maksud blending adalah mencampur antara warna satu dengan warna lainnya. Contohnya mencampur warna merah dengan warna hijau maka akan secara otomatis warna hasil adalah warna pencampuran dengan scala tertentu. - Hasil trace, pengubahan bitmap ke vektor cukup baik
Pengubahan dari bitmap ke vektor sangat banyak digunakan, ini dikarenakan sifat vektor yang tidak pecah saat ada proses transformasi. Tracing bitmap tersedia dalam berbagai mode pilihan sehingga dapat disesuaikan dengan kebutuhan. - Untuk proses cetak hasil memuaskan
Maksudnya perbedaan antara tampilan pada layar monitor dan hasil cetak tidak terlalu banyak. Sehingga bisa dibilang hasil cetak sesuai dengan apa yang ditampilkan pada layar monitor. Juga bisa digunakan untuk separasi sablon. Tentu saja agar dapat menjadi optimal kita harus mengkalkulasi ulang dan menyesuaikan beberapa has seperti layar monitor, tinta printer, kertas printer dan jenis printer itu sendiri.
Model visualisasi yang digunakan untuk
digital seperti komputer dan piranti elektronik lainnya hasil kurang
bisa memuaskan terutama pewarnaan yang tidak bisa secerah Adobe Illustrator. Meskipun bisa disiasati tetapi masih dengan cara yang agak lama.
Semoga Anda menikmati artikel ini dan jangan lupa bergabung dengan teman-teman yang lain di Facebook AhliDesain, dan ikuti Twitter saya. Jika Anda menyukai artikel-artikel dari saya jangan lupa untuk memasukkannya dalam subscribe ke ahlidesain RSS Feed.
Bila ada yang ditanyakan, saran, tanggapan dan ide kreatif silakan isi pada komentar, saya akan mencoba menjawab secepat dan sebaik mungkin.
Materi TIK Kelas XII Semester Genap
1. Mengenal PowerPointMicrosoft PowerPoint merupakan software produk Microsoft® yang dikhususkan untuk pembangunan atau pembuatan slide untuk presentasi. Microsoft PowerPoint memiliki beberapa alat bantu (tools) yang membantu perancang slide untuk mendesain slide sehingga tampil lebih menarik dan mudah dikendalikan saat melakukan presentasi.
Sebelum kita mengenal PowerPoint, kita buka dulu software Microsoft PowerPoint. Untuk membukanya, klik tombol Start - All Program - Microsoft Office - Microsoft PowerPoint
Langganan:
Postingan (Atom)
Adobe Photoshop adalah perangkat lunak editor citra buatan Adobe Systems yang dikhususkan untuk pengeditan foto/gambar dan pembuatan efek karena berbasis titik (bitmap).
Versi kedelapan aplikasi ini disebut dengan nama Photoshop CS, versi sembilan disebut Photoshop CS2 dan terakhir ini adalah Adobe Photoshop CS3 (Creative Suite).
Area Kerja Adobe Photoshop CS3
A : Menu Bar, berisi perintah utama untuk membuka file, save, mengubah ukuran gambar, filter dan lain-lain. Juga ditampilkan keyboard shortcuts seperti: New (Ctrl+N), Open (Ctrlp+O), dan lain-lain
B : Option, berisi pilihan dari tool yang Anda pilih. Misalnya dipilih kuas/brush, maka ukuran/diameter juga opacity brush ada di sini.
C : Gambar, menampilkan besar kanvas atau gambar yang sedang dibuka, diedit atau dibuat.
D : Pallete Well, cara cepat untuk mengakses palet brushes, tool resets dan Layer Comps. Juga dapat digunakan untuk meletakkan palet yang sering digunakan.
E : Toolbox, berisi tool-tool untuk menyeleksi dan memodifikasi gambar.
F : Palette, berisi jendela-jendela kecil yang di dalamnya terdapat perintah dan pilihan untuk dokumen/gambar yang sedang dikerjakan. Anda dapat meletakkan palet yang sering digunakan sekaligus menutup palet lain yang tidak digunakan. Panggil palet melalui menu utama window.